Conditional Formatting
3:55Learn some of the different ways you can view data in tables. With Coda, it's easy to dynamically add color to a cell or row to highlight different data types, depending on specific values that show up in the table.
Resources
- Conditional format | Coda Essentials
- Connect your doc with Packs
- Using Coda Packs
- Packs | Coda Essentials
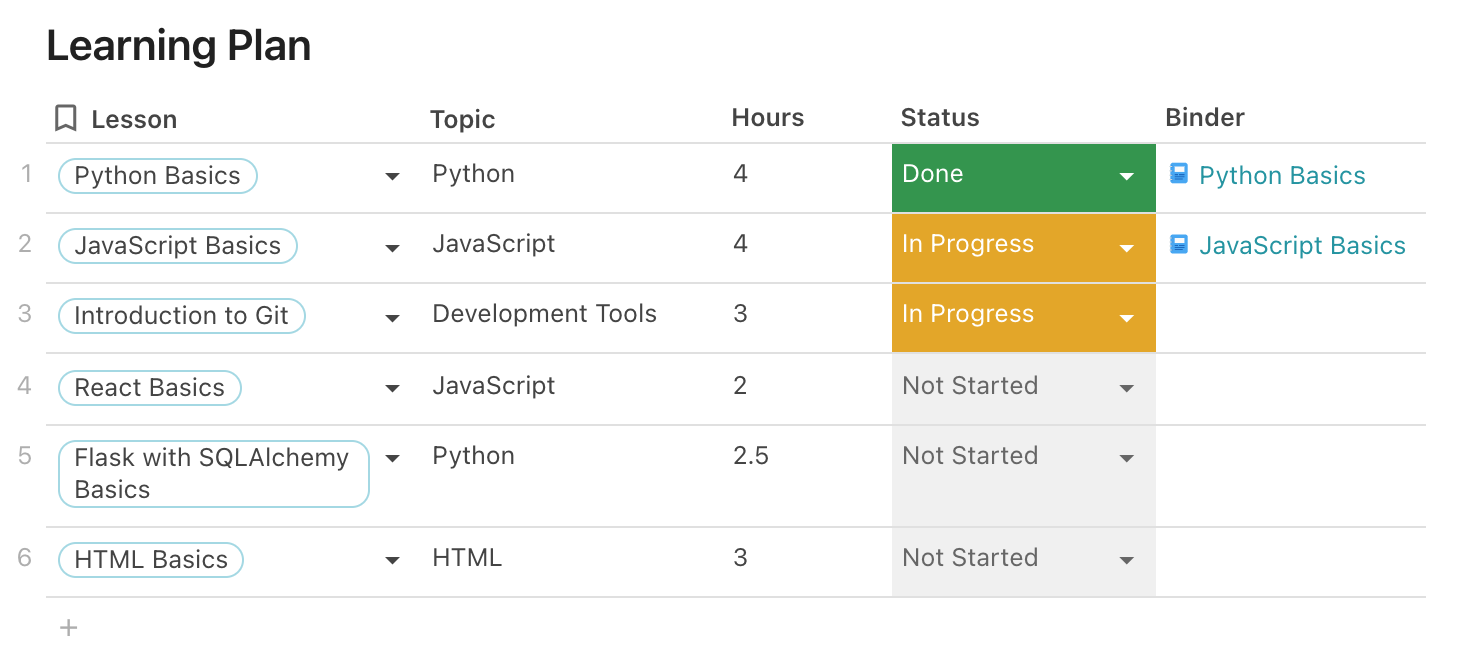
Display other data from the "Lessons" table in your "Learning Plan" table
- Click the + icon to add a new column to the Learning Plan Table. Leave the data type as the default, "T" – or text.
- Name the new column – for example, "Hours".
- Click the "T" data type icon in the new column header, then select "Add formula" from the list.
- To pull display other attributes of a lesson in your new column, type "Lesson" into the "Add column formula" field.
- The following formulas display other types of data in your column:
-
Lesson.Est Hours– Est Hours -
Lesson.Treehouse Link– Treehouse Link
-
Your "Learning Plan" table displaying the new data should look similar to the table below:
Related Discussions
Have questions about this video? Start a discussion with the community and Treehouse staff.
Sign upRelated Discussions
Have questions about this video? Start a discussion with the community and Treehouse staff.
Sign upYou've just learned how easy it is to manage and 0:00 look up data from multiple tables in Coda. 0:03 Next, I'll show you several different ways you can view data in tables. 0:06 With Coda, it's easy to dynamically add color to a cell or row to highlight 0:10 different types of data depending on specific values that show up in the table. 0:15 You've already had a sneak peek of how conditional formatting works in 0:20 a previous Coda workshop. 0:23 Now I'm going to give you an opportunity to try it out for yourself. 0:25 You'll start by customizing your learning plan so that when you select Done in 0:29 the Status column, the background color of the Done cell will turn green. 0:33 When you select In Progress, it'll turn yellow, and 0:38 if you choose Not Started, it'll turn light gray. 0:41 All right, go to your Treehouse Workbook now and 0:45 select the My Student Planner page. 0:48 Hover over to the right of the Lesson column and 0:52 click on the column header to view the lookup type options. 0:55 Notice how the lesson drop down list options are being pulled from 0:59 another table called Lessons on the Admin & Data page. 1:04 Here are all the lessons, each has a title, 1:09 topic, Treehouse link, and the estimated time in hours. 1:12 You can view all this data in the Learning Plan table when you hover over a lesson. 1:17 Now, hover over to the right of the Status column header and 1:27 click the select list data type icon to view the select list data type options. 1:32 Notice how the status options aren't being pulled from another table like the lesson 1:39 options were. 1:44 Instead, they've been manually listed here as options separated by commas. 1:45 So we have Not Started, In Progress, and Done. 1:51 Back in the select list data type drop down, go to Format, 1:58 then select Conditional format, and you'll see a list of all 2:02 the status options such as Not Started, In Progress, and Done. 2:07 We're going to customize this table so that whenever you select a status, 2:13 this cell displays the color you've specified. 2:17 Let's set this up now. 2:20 So first, if status is Done, 2:21 I'll make the background of the cell green. 2:25 I'll duplicate this, and here, 2:34 I'll say if status is In Progress, 2:38 I'll make the background of the cell yellow. 2:42 I'll duplicate it again, and here I'll select Not Started, 2:49 and if status is Not Started, I'll make the cell light gray. 2:56 Conditional formatting lets you not only change the color, but 3:06 also the text style as well. 3:10 It's a great way to highlight data presented in a table based on specific 3:12 conditions. 3:16 To extend, the power of a table like this, Coda also lets you add automations with 3:23 packs that are triggered by conditions, such as changes to values in a row. 3:29 So in our example here, each time the status changes to Done, 3:34 you can use the Gmail or Slack packs to configure Coda to notify someone to let 3:38 them know via email or Slack, for example. 3:43 I've posted resources about Coda packs in the teacher's notes with this video. 3:46 Up next, 3:50 I'll show you how to hide the amount of data you want to display in a table. 3:51